Friday, June 28, 2013

Compound Butters

Beginning at top-left in a clockwise direction:
Dill, whole garlic scapes, butter, radishes, and in the center, thinly sliced garlic scapes.


Compound herb butters are a cinch to make.  All that’s needed is butter and the fresh herb (or herbs) of your choice.  Mince the herb, mix it with softened butter, and there you have it-compound herb butter!  

The butters can be used in many different ways. For instance, you can spread radish butter on a baguette and then toast it under the broiler or on a grill; garlic scape butter can be used in the same way to make garlic bread.  Dill butter is great when used with fish or even on a bagel.  Any of these butters can be used in cooking, to finish off a steak, fish, or chicken, or to enhance the flavor of vegetables.  What herb(s) to add and what to use them with is only limited by your imagination.

Properly stored, the butters will last for a year or more in the freezer.  In the summer months, you can make the butters fresh so I definitely like to store some of them now to use during the cold, winter months.  To store the packaged compound butter in the freezer, put it in a freezer bag marked with the date.


Radish Butter

The resulting flavor of this butter is surprisingly sweet (mildly so) and delicate.  The butter will not overwhelm your taste buds, making you feel like you just bit into a huge radish; it's delicate yet flavorful, and unless you tell someone it's radish butter, they probably won't guess.

8 ounces of softened butter
5-6 medium sized radishes

With a small slotted grater, grate the radishes into a bowl.


As you can see in the photo below, the radishes contain a fair amount of water.  Grabbing small handfuls at a time, sqeeeeeeze the water from the radishes and then place the compact balls in a separate dish.


Water-free

Now, loosen the grated radish and mix them into your softened butter.  And, for heaven's sake, use real butter!  Butter has been vilified wrongly for far too long.  Butter made from the milk of green grass fed cows, which have also been raised humanly and naturally, is rich with vitamins A, D, E & K2, important trace minerals, healthy fatty acids, conjugated linoleic acid (CLA), and omega-3 and omega-6 fats.  Butter is delicious and good for you.


Garlic Scape Butter

8 ounces of softened butter
7-8 garlic scapes, with flower head removed


Thinly slice the scapes and then mince the slices.


 Blend the butter and minced scapes together well.


Scoop the mixture back into the package the butter came in, or a sheet of waxed paper, fold and store.


You get the idea- mix 8 ounces of softened butter with any fresh herb of your choice and you then have a compound butter.  The possibilities are endless and delicious!


Wednesday, June 19, 2013

Pistachio Bundt Cake with Buttermilk-Lime Glaze

When I was girl, my Mom's friend, Joanne, was quite the baker.  She would bake homemade desserts on a regular basis for her family, and there were always a couple from-scratch desserts available at their summer gatherings.  One of the cakes that my Mom really enjoyed was Joanne's pistachio bundt cake.  This happened to be a cake that Joanne didn't make from scratch but it was delicious nonetheless.  Joanne copied down the recipe for my Mom and she's been making it ever since.

The recipe was quite simple really: a boxed yellow cake mix and two boxes of instant pistachio pudding combined with a couple additional ingredients.  Pour the final mixture into a bundt pan, bake and viola!

Those pistachio bundt cakes set me on a path to love all things Bundt, but, as I grew older and more conscious of what I ate, it bothered me that this beloved pistachio cake was a processed nightmare.  More along the lines of a Chemical-Pistaschio Bundt Cake than anything resembling "cake" or actually containing pistachio nuts.  The instant pudding mix contains "less than 2%" of pistachio nuts!  Boo.

The last time I made the boxed version of the cake I swore it would be the last time. Determined to create a from-scratch pistachio cake recipe, I consulted "The Joy" for a yellow cake recipe.  Then I recalled a vendor at a local art fair last summer who sold her homemade nut butters.  Heck, I had tasted her pistachio butter and even thought then that it could be used to make cake.  How could this epiphany have slipped my mind?!

Adapted from The Joy of Cooking's yellow cake recipe, here is my from-scratch recipe for:

Pistachio Bundt Cake with a Buttermilk-Lime Glaze

Preheat the oven to 350˚
Grease and flour a Bundt cake pan.  Take care to reach every nook and cranny.

Sift together and set aside:
2-2/3 cups all-purpose unbleached flour
2-1/4 tsp baking power
1/2 tsp salt

In a measuring cup combine and set aside:
1 cup milk
2 tsp vanilla extract
1/2 tsp almond extract

In a large bowl, cream 2 sticks of butter (1/2 pound).  Add 1-1/2 cups of sugar to the butter and beat until light and creamy.  Then add 4 large eggs and mix well.  Alternating the flour mixture and the milk mixture, add and blend each with the butter/egg mixture.  Add 1 cup of Futters pistachio nut butter, 1/2 cup vegetable oil, and 1 TB of walnut oil and blend well.

Add the cake batter to your Bundt pan and bake for 45-55 minutes, or until a toothpick comes out clean.

Buttermilk-Lime Glaze:
2 TB of well-shaken buttermilk
1-1/2 cups confectioners sugar
Zest of two limes

Once the cake has cooled completely, whisk the above three ingredients together and then drizzle the glaze over the bundt cake.

Moist, nutty, and delicious!


Paella de Marisco


Paella de Marisco 
(this recipe will create a 26” paella, enough for 12-24 people)

To a large stockpot add:
12-15 cups chicken stock
2 tsp saffron, ground with a mortar and pestle

1 medium onion, peeled and cut in half
1 TB smoked sweet paprika
2 bay leaves

Simmer, covered, until onion is soft and translucent.  Keep stock simmering until you begin to prepare the paella.  You want the stock to be boiling hot by the time you’re ready to add it to the paella pan, so remember to adjust the heat a few minutes before you’re ready to add the stock.

Using seasoned wood or hardwood lump charcoal, build a fire hot enough to maintain a rapid simmer once the stock and rice is added to the pan, but not so hot that the stock evaporates faster than the rice can absorb it.  The latter will result in a burnt paella.  Achieving (and maintaining) the right temperature of the fire can be the trickiest part of the entire cooking process.  However, don’t let this deter you from attempting to make this fantastic dish over an open fire; the result is phenomenal. 

To the paella pan add:
1/8 cup olive oil
1 large onion, finely chopped
Sauté for a minute and then add...

8 large cloves of garlic, minced
12 scallions, chopped
Sauté for a minute and then add...

15.8 ounces dry-cured chorizo, sliced
4 chicken thighs, cut into bite-sized pieces
Sauté for 3-4 minutes and then add...


1 TB kosher salt
2 cups dry white wine
4 TB fresh parsley, minced
3 TB fresh thyme leaves

Stir contents together and then add to the paella pan…

12 cups of boiling hot chicken stock (minus the onion and bay leaves)
4 cups (equivalent to two pounds) of Calasparra rice.  Sprinkle the rice in the pan to help evenly distribute it.  Allow the mixture to simmer for 3-4 minutes, without stirring, before adding the remainder of the components.


Beyond this point, it is forbidden to stir the paella!  Stirring will prevent socarrat from forming on the bottom of the pan, which is key to adding a depth of flavor to your paella that cannot be obtained any other way.  Socarrat is a thin layer of rice on the bottom of the pan that becomes caramelized and crispy (not burnt), and is quite delicious.  Again, have a fire hot enough to maintain a rapid simmer but not so hot that the stock evaporates faster than the rice can absorb it. 

You’re now ready to assemble a visual masterpiece!  Add to the paella pan, distributing evenly, one ingredient at a time:

2 pounds firm-fleshed fish (such as Amberjack or Halibut), cut in bite-sized pieces
2 cups of peas
14-ounce can of artichoke hearts, plus brine
Fresh-squeezed juice from one lemon
2 dozen mussels, scrubbed and debearded, seam side down
2 dozen littleneck clams, seam side down (you want the shellfish to open facing up)

2 dozen scallops
24 large shrimp, peeled and deveined
8-ounce jar of roasted piquillo pepper, cut into strips
Thinly sliced lemon rings from one lemon


Cover the paella pan with foil and allow paella to cook for 20-25 minutes.  Then, taste rice for doneness.  If the rice is nearly done but a fair amount of liquid remains in the pan, let the paella finish cooking uncovered for roughly another 10 minutes.  Conversely, if too little stock remains, add more hot stock (as much as you feel is necessary), re-cover, and cook until rice is done,  checking frequently.


Serve with lemon wedges, a sliced, warm baguette, and Verdejo wine.  

Enjoy!


Tuesday, March 26, 2013

Carrot Cake Cupcakes with Goat Cheese Frosting

While dining out with friends on evening in May 2012, for dessert, I ordered "Carrot Cake with Goat Cheese".  That dessert stood out to me on the menu like a neon sign.  In fact, my eyes bulged when I spotted it.  Whatever else was included on that dessert menu did not matter; I set the menu down, shared my joy with a friend equally as enthusiastic about carrot cake and goat cheese, and waited anxiously for our server to return.

Carrot cake is among my favorite cakes, and the list is short.  Goat cheese is for me what chocolate is for some.  If goat cheese is on, in, or served along with something, there's a terrifically high chance I'll be interested in consuming the dish.

Hands down, it was the most delectable and memorable dessert I've ever eaten. Moist and uncomplicated carrot cake topped with a goat cheese frosting.

After making some guesses as to how the frosting was made, I asked our server to inquire with the chef about his willingness to divulge what ingredients were used to make it.  The server returned and shared the following: cream cheese, goat cheese and confectioners sugar.  My guess is that there was more to it than that, but felt armed with enough information to try and recreate the frosting at home.  The recipe below is my best attempt to duplicate what topped that amazing dessert.

Goat Cheese Frosting

8 oz. cream cheese, softened
4 oz. goat cheese, softened
2 cups confectioners sugar
1 stick butter, softened
1/4 tsp Madagascar Bourbon Pure Vanilla Bean Paste

Using an electric mixer, blend the cheeses together.  Then, with the mixer on low, add the confectioners sugar in small batches at a time.  Once the sugar is incorporated, add the stick of softened butter and vanilla bean paste and mix well until the frosting is light and fluffy.  Keep cool in the refrigerator until you're ready to use the frosting.

You'll find the recipe for the carrot cake cupcakes at the Smitten Kitchen food blog.  The cupcakes are delicious!  Their recipe calls for making the cupcakes with a maple cream cheese frosting, which sounds fantastic, but I had a bee in my bonnet about making goat cheese frosting. I plan to make these cupcakes again and do so according to the full Smitten Kitchen recipe.  For now, it's all about the goat cheese frosting!


Friday, March 8, 2013

Stuffed Bell Peppers

The idea of stuffed bell peppers always appealed to me... until I would eat one.  The unimaginative white rice and ground beef stuffing is so dull, not to mention practically flavorless.  The use of white rice is almost always criminal, as far as I'm concerned.

With very few exceptions, after years of being disappointed by what could be a taste sensation, I dedicated myself to creating a stuffing that would compliment the flavor of the bell pepper and be a feast for the eyes.  The idea that the stuffing should look like confetti stayed in my mind throughout the process.

In a large bowl add and mix the following:

1 cup basmati rice (measured raw)
1 cup cooked wild rice (measured raw)
1/2 cup cooked couscous (measured raw)
1 cup walnuts, finely chopped
1 cup pine nuts
1/2 cup fresh basil
1/2 cup fresh mint
1/4 cup fresh parsley
1/4 cup dried apricots, finely chopped
1/2 cup red onion, chopped
28 ounce can diced tomatoes, without juice
1/4 tsp ground clove
1/4 tsp ground cinnamon
1/4 tsp ground coriander
S&P to taste

Once the above ingredients are blended, add two large, lightly beaten eggs to the bowl.  Mix to incorporate the eggs evenly with the other components.

You're now ready to stuff your peppers.  Hopefully, you've been adventurous and purchased a combination of green, red, orange and yellow peppers.  Cut away an opening from the top of the pepper, reserving the cap.  Scoop out any seeds or thick membrane from the interior of the pepper.

This mixture will fill 12-14 bell peppers, depending on their individual size.  Go ahead and make this many!  Whatever you don't plan to consume immediately can be frozen in pairs or fours for future meals.

To my baking dish I add a couple heaping ladlefuls of marinara sauce, then stand the peppers in the dish and fill them one by one.  The filling should be comfortably full, not tightly packed. Once full, add a tad more marinara on top of each pepper and then replace the pepper cap. Cover the baking dish with foil and place into a 375˚ F oven.  Bake for 45-50 minutes.  Serve with marinara on the side.  Delicious.

Wednesday, February 27, 2013

Leeks and Fennel with Amberjack and Halibut poached in white wine and vegetable broth

This recipe had its genesis after dining out with a friend one evening.  We ordered two different meals and while I enjoyed mine, my friend Joan reluctantly picked at hers.  Joan told me that she liked the flavor of the dish but for some reason she was apprehensive about eating it. Joanie let me taste a bite of the dish that sat before her and, wow, was it delicious!  The flavors were delicately complex.  The fish had been poached in the broth, which enhanced their flavor without masking it, and the broth itself was light and herbaceous.   I was surprised that she wasn't enjoying her meal more than she was.

We talked about the dish, which by then I wish I had ordered, and tweaks we might make to it in our own kitchens.  From my messenger bag I pulled out a notepad and pen and wrote down what the restaurant had written on their menu board:

Mediterranean poached Amberjack & Halibut with leeks, fennel and heirloom tomatoes


The dish was served with a marjoram potato gratin, which was included on the same plate. One of the tweaks Joan and I readily agreed upon is that the gratin should be served in a ramekin on the side. 

An inquiry with our server revealed that the broth the fish were poached in was comprised of white wine, a light vegetable stock, fennel (fresh and seeds), and finely chopped heirloom tomatoes.  Fennel fronds were used to garnish the dish.

Amberjack isn't easy to find but if you can, use it in this dish.  It is a meaty off-white fish with a delicate flavor.

This recipe, which until now has only been in my head, is my best attempt to duplicate the flavorful dish that Joan ordered that evening long ago.  'Amberjack' remains an inside joke for us to this day.

-Thinly slice a small-medium bulb of fennel, fronds and all.  
-Thinly slice the whites of 3 medium-large leeks.
-Add the fennel and leeks to a deep skillet with 2 TB olive oil.  Toss until the mixture is coated with the oil.  Sauté until the leeks are translucent and the fennel becomes tender.  
-Add 1/2 cup dry white wine along with 1-1/2 cups of light vegetable stock to the pan.
-Dice a large red or orange heirloom tomato of your choice and add it to the mixture.
-Add a couple pinches of salt, the equivalent of about 1/2 tsp
-Add 1 TB of dried marjoram and 1/4 tsp of ground fennel seed
-2 tsp of fresh lemon juice

Cover and allow this mixture to gently simmer for 20-25 minutes.  Taste and adjust seasoning as desired.  

Cut the filets of amberjack and halibut into rough one inch chunks and then add to the broth to poach.  Let the amount of fish you add be dictated by the number of people who will be eating the dish.  The dish should be light, not crowded with fish.

I enjoy serving this over a thin bed of basmati rice in a shallow bowl.  You can make a potato gratin if you wish.


Thursday, January 17, 2013

Butternut squash, spinach with caramelized onions, and yellow squash lasagna with a béchamel sauce

The mere mention of butternut squash makes my mouth water.  Everything about that lovely winter squash is appealing to me.  Its warm tan skin that yields to a pleasing orange flesh; its aromatic scent, and sweet, earthy flavor.  No matter how butternut squash is cooked it is absolutely delicious.

We had two small butternut squash leftover from another dish that called for them.  How to use the extra butternut squash, I wondered?  Thinking of the bad ass 4" deep lasagna pan my brother gave me for Christmas...  Lasagna!  Once this thought entered my mind the rest of the recipe fell into place.

First, start heating a large stock pot of water to cook the noodles.

To make the béchamel sauce I used Julia Child's recipe from Mastering the Art of French Cooking.  It is as follows:

This basic sauce takes about 5 minutes to make, and is then ready for the addition of flavors or enrichments.  

For 2 cups (medium thickness)
                                                   ____________________________

  • A heavy-bottomed, 6-cup enameled, stainless steel, lined copper, porcelain, or pyrex saucepan.
  • 2 TB butter
  • 3 TB flour
  • A wooden spatula or spoon
In the saucepan melt the butter over low heat.  Blend in the flour, and cook slowly, stirring, until the butter and flour froth together for 2 minutes without coloring.  This is now a white roux.

                                                   ____________________________

  • 2 cups of milk and 1/4 tsp salt heated to the boil in a small saucepan
  • To the milk I added 1-1/2 cups of heavy whipping cream.  This addition is considered an enrichment.
  • A wire whip
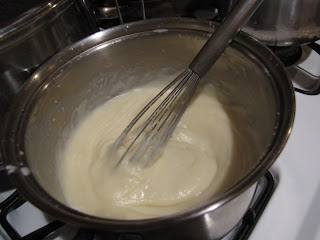
Remove roux from heat.  As soon as roux has stopped bubbling, pour in all the hot liquid at once.  Immediately beat vigorously with a wire whip to blend liquid and roux, gathering in all bits of roux from the inside edges of the pan.

Set saucepan over moderately high heat and stir with the wire whip until the sauce comes to the boil.  Boil for 1 minute, stirring.
                                                   ____________________________
  • Salt and white pepper
Remove from heat, and beat in salt and pepper t taste.  Sauce is now ready for final flavorings or additions.

* If not used immediately, clean sauce off inside edges of pan with a rubber scraper.  To prevent a skin from forming on its surface, float a thin film of milk, stock, or melted butter on top.  Set aside uncovered, keep it hot over simmering water, refrigerate, or freeze it.
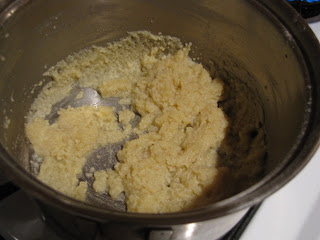
Once the béchamel was finished, to it I added a 1/2 tsp of roasted granulated garlic, a 1/2 tsp of thyme, 2 tsp of parsley flakes, another 1/2 cup of heavy whipping cream, and 1 TB Romano cheese powder.

White roux

Adding milk mixture to roux

Finished béchamel.
Too bad the image is out of focus.


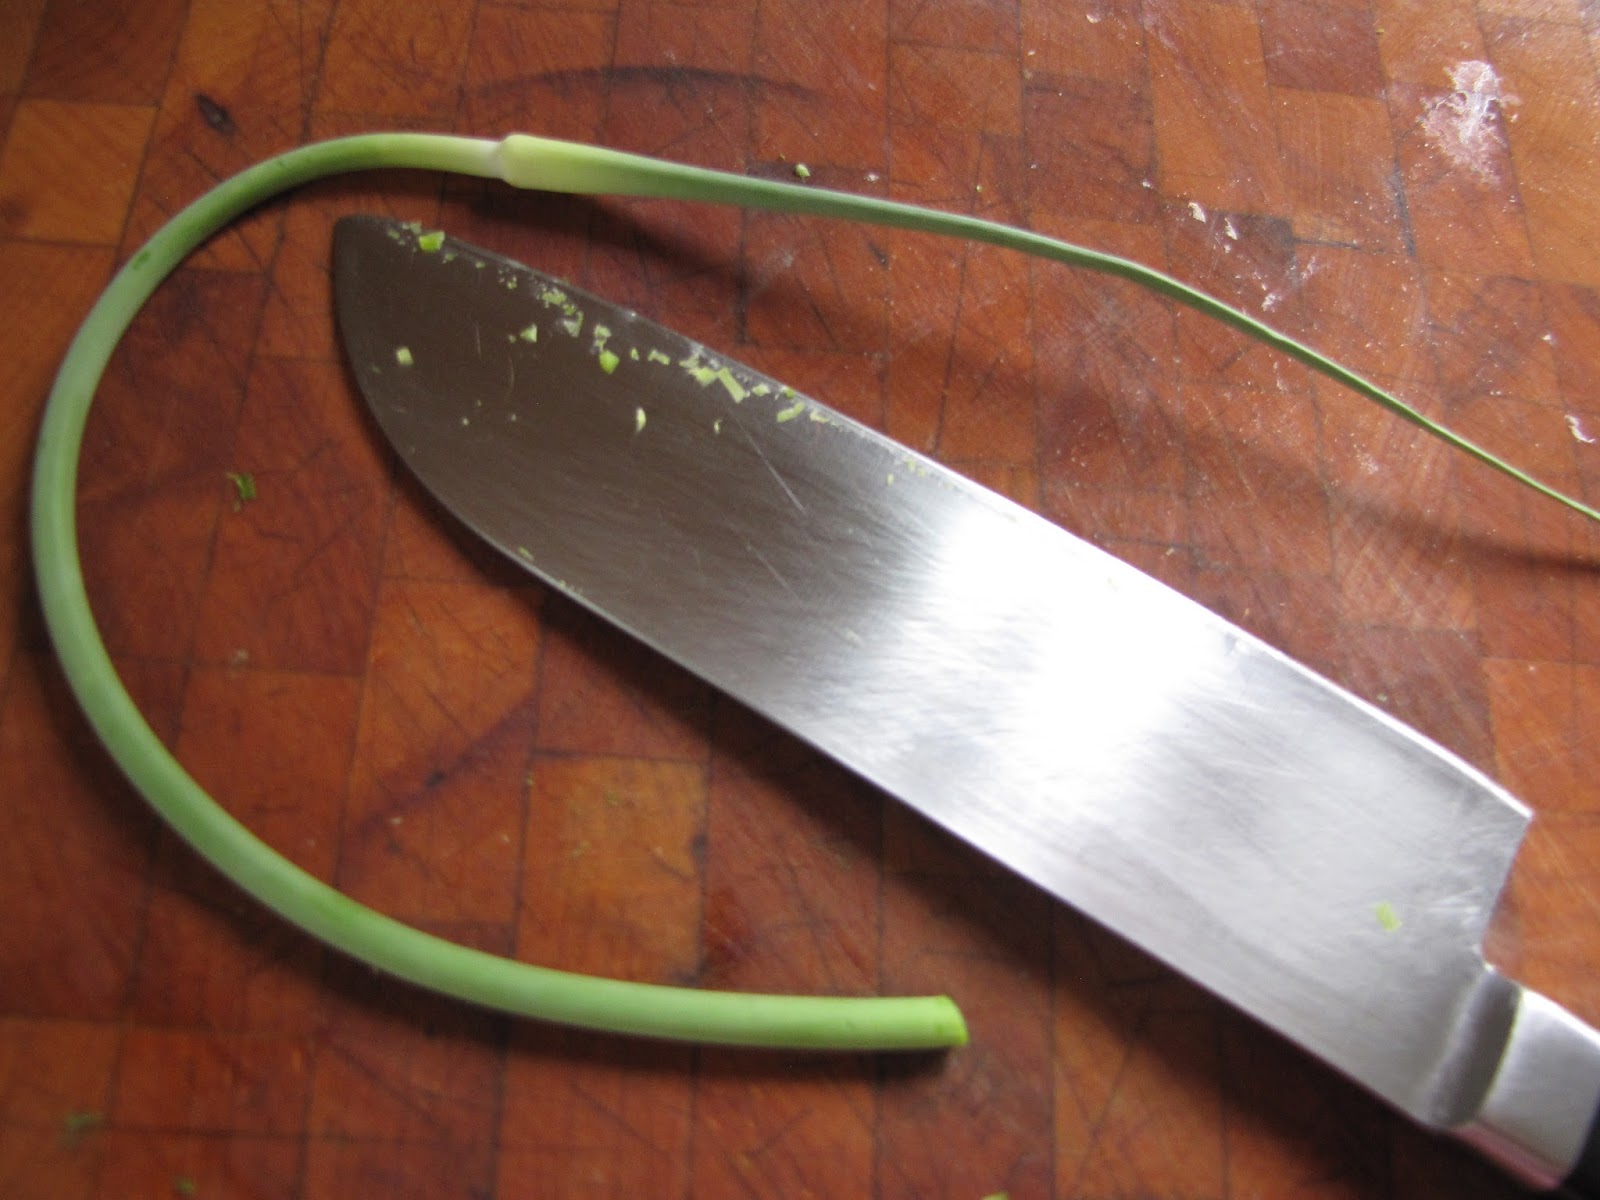
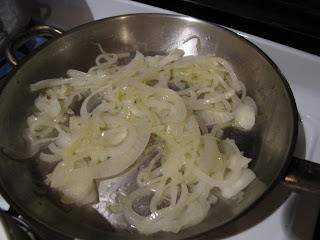
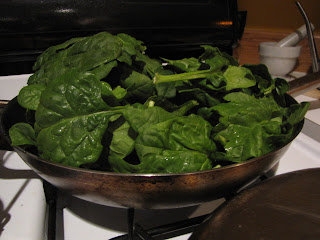
Next, thinly slice a large yellow onion (Vidalia, if they're in season) and begin sautéing it in a large skillet with a couple tablespoons of olive oil.  You should have about two cups of sliced onion, give or take.  Allow them to sauté slowly, stirring occasionally, until they begin to turn golden brown.  Once the onions reach this stage, add a 10-ounce bag of raw spinach to the same pan, right on top of the onions, along with 2 TB of water.  Place a tight fitting lid on the skillet, turn the flame up to medium-high, and allow the spinach to cook down.  Once cooked down, stir to mix the onions and spinach together.  Turn the heat off once the spinach has finished cooking.


Now for the squash - you will need two smaller butternut squash.  Trim away the skin and then run the squash lengthwise across a mandolin to shave thin slices off with each pass. Do this until you just reach the seeds.  Turn the squash and shave until you reach the seeds, and repeat.  After you've shaved away all four sides of the squash, cut away the core and then shave what remains of the neck.


Slice the yellow squash crosswise using the mandolin.  One average sized yellow squash will yield about 1-1/2 - 2 cups thinly sliced rounds.


Add the yellow squash to a skillet with 1 TB olive oil and lightly sauté over medium heat. Once they've softened and are slightly golden, remove from heat and set aside.

You're now ready to assemble the lasagna!  At this point, turn your oven on 375° F degrees to preheat.

Add a ladleful or two to the bottom of the lasagna pan, and then a layer of noodles.  Allow the sides of the noodles to overlap slightly.  Then, layer thusly:

  • Butternut squash (randomly added, not neat rows in a single layer)
  • Sauce
  • Sprinkle 1 TB of Romano cheese powder over sauce
  • Noodles
  • Butternut squash (again, randomly added)
  • Sauce
  • 1 TB Romano cheese power sprinkled over sauce
  • Noodles
  • Spinach and onion mixture
  • Noodles
  • Yellow squash with 1 TB Romano cheese power sprinkled on top
  • Noodles
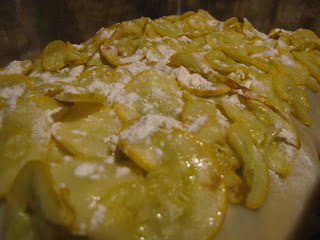
  • Top generously with béchamel sauce, more Romano cheese powder, and parsley flakes


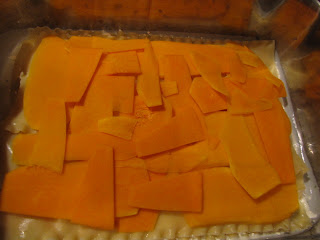
Not all of the butternut squash were used.  Most of them, but not all.

Yellow squash layer

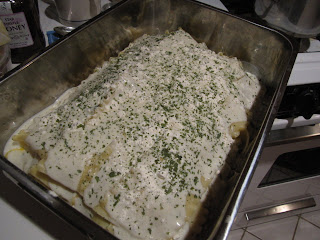
Ready to go into the oven

Bake for 50 - 60 minutes in the center of the oven.
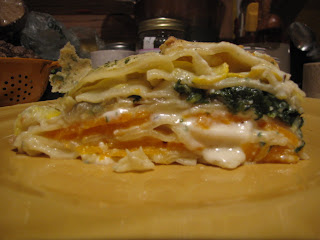
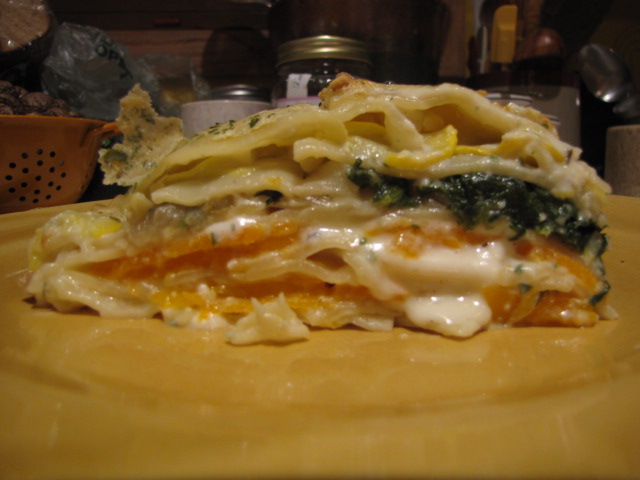
Viola!
Bon Appétit!