Tuesday, March 26, 2013

Carrot Cake Cupcakes with Goat Cheese Frosting

While dining out with friends on evening in May 2012, for dessert, I ordered "Carrot Cake with Goat Cheese".  That dessert stood out to me on the menu like a neon sign.  In fact, my eyes bulged when I spotted it.  Whatever else was included on that dessert menu did not matter; I set the menu down, shared my joy with a friend equally as enthusiastic about carrot cake and goat cheese, and waited anxiously for our server to return.

Carrot cake is among my favorite cakes, and the list is short.  Goat cheese is for me what chocolate is for some.  If goat cheese is on, in, or served along with something, there's a terrifically high chance I'll be interested in consuming the dish.

Hands down, it was the most delectable and memorable dessert I've ever eaten. Moist and uncomplicated carrot cake topped with a goat cheese frosting.

After making some guesses as to how the frosting was made, I asked our server to inquire with the chef about his willingness to divulge what ingredients were used to make it.  The server returned and shared the following: cream cheese, goat cheese and confectioners sugar.  My guess is that there was more to it than that, but felt armed with enough information to try and recreate the frosting at home.  The recipe below is my best attempt to duplicate what topped that amazing dessert.

Goat Cheese Frosting

8 oz. cream cheese, softened
4 oz. goat cheese, softened
2 cups confectioners sugar
1 stick butter, softened
1/4 tsp Madagascar Bourbon Pure Vanilla Bean Paste

Using an electric mixer, blend the cheeses together.  Then, with the mixer on low, add the confectioners sugar in small batches at a time.  Once the sugar is incorporated, add the stick of softened butter and vanilla bean paste and mix well until the frosting is light and fluffy.  Keep cool in the refrigerator until you're ready to use the frosting.

You'll find the recipe for the carrot cake cupcakes at the Smitten Kitchen food blog.  The cupcakes are delicious!  Their recipe calls for making the cupcakes with a maple cream cheese frosting, which sounds fantastic, but I had a bee in my bonnet about making goat cheese frosting. I plan to make these cupcakes again and do so according to the full Smitten Kitchen recipe.  For now, it's all about the goat cheese frosting!


Friday, March 8, 2013

Stuffed Bell Peppers

The idea of stuffed bell peppers always appealed to me... until I would eat one.  The unimaginative white rice and ground beef stuffing is so dull, not to mention practically flavorless.  The use of white rice is almost always criminal, as far as I'm concerned.

With very few exceptions, after years of being disappointed by what could be a taste sensation, I dedicated myself to creating a stuffing that would compliment the flavor of the bell pepper and be a feast for the eyes.  The idea that the stuffing should look like confetti stayed in my mind throughout the process.

In a large bowl add and mix the following:

1 cup basmati rice (measured raw)
1 cup cooked wild rice (measured raw)
1/2 cup cooked couscous (measured raw)
1 cup walnuts, finely chopped
1 cup pine nuts
1/2 cup fresh basil
1/2 cup fresh mint
1/4 cup fresh parsley
1/4 cup dried apricots, finely chopped
1/2 cup red onion, chopped
28 ounce can diced tomatoes, without juice
1/4 tsp ground clove
1/4 tsp ground cinnamon
1/4 tsp ground coriander
S&P to taste

Once the above ingredients are blended, add two large, lightly beaten eggs to the bowl.  Mix to incorporate the eggs evenly with the other components.

You're now ready to stuff your peppers.  Hopefully, you've been adventurous and purchased a combination of green, red, orange and yellow peppers.  Cut away an opening from the top of the pepper, reserving the cap.  Scoop out any seeds or thick membrane from the interior of the pepper.

This mixture will fill 12-14 bell peppers, depending on their individual size.  Go ahead and make this many!  Whatever you don't plan to consume immediately can be frozen in pairs or fours for future meals.

To my baking dish I add a couple heaping ladlefuls of marinara sauce, then stand the peppers in the dish and fill them one by one.  The filling should be comfortably full, not tightly packed. Once full, add a tad more marinara on top of each pepper and then replace the pepper cap. Cover the baking dish with foil and place into a 375˚ F oven.  Bake for 45-50 minutes.  Serve with marinara on the side.  Delicious.

Wednesday, February 27, 2013

Leeks and Fennel with Amberjack and Halibut poached in white wine and vegetable broth

This recipe had its genesis after dining out with a friend one evening.  We ordered two different meals and while I enjoyed mine, my friend Joan reluctantly picked at hers.  Joan told me that she liked the flavor of the dish but for some reason she was apprehensive about eating it. Joanie let me taste a bite of the dish that sat before her and, wow, was it delicious!  The flavors were delicately complex.  The fish had been poached in the broth, which enhanced their flavor without masking it, and the broth itself was light and herbaceous.   I was surprised that she wasn't enjoying her meal more than she was.

We talked about the dish, which by then I wish I had ordered, and tweaks we might make to it in our own kitchens.  From my messenger bag I pulled out a notepad and pen and wrote down what the restaurant had written on their menu board:

Mediterranean poached Amberjack & Halibut with leeks, fennel and heirloom tomatoes


The dish was served with a marjoram potato gratin, which was included on the same plate. One of the tweaks Joan and I readily agreed upon is that the gratin should be served in a ramekin on the side. 

An inquiry with our server revealed that the broth the fish were poached in was comprised of white wine, a light vegetable stock, fennel (fresh and seeds), and finely chopped heirloom tomatoes.  Fennel fronds were used to garnish the dish.

Amberjack isn't easy to find but if you can, use it in this dish.  It is a meaty off-white fish with a delicate flavor.

This recipe, which until now has only been in my head, is my best attempt to duplicate the flavorful dish that Joan ordered that evening long ago.  'Amberjack' remains an inside joke for us to this day.

-Thinly slice a small-medium bulb of fennel, fronds and all.  
-Thinly slice the whites of 3 medium-large leeks.
-Add the fennel and leeks to a deep skillet with 2 TB olive oil.  Toss until the mixture is coated with the oil.  Sauté until the leeks are translucent and the fennel becomes tender.  
-Add 1/2 cup dry white wine along with 1-1/2 cups of light vegetable stock to the pan.
-Dice a large red or orange heirloom tomato of your choice and add it to the mixture.
-Add a couple pinches of salt, the equivalent of about 1/2 tsp
-Add 1 TB of dried marjoram and 1/4 tsp of ground fennel seed
-2 tsp of fresh lemon juice

Cover and allow this mixture to gently simmer for 20-25 minutes.  Taste and adjust seasoning as desired.  

Cut the filets of amberjack and halibut into rough one inch chunks and then add to the broth to poach.  Let the amount of fish you add be dictated by the number of people who will be eating the dish.  The dish should be light, not crowded with fish.

I enjoy serving this over a thin bed of basmati rice in a shallow bowl.  You can make a potato gratin if you wish.


Thursday, January 17, 2013

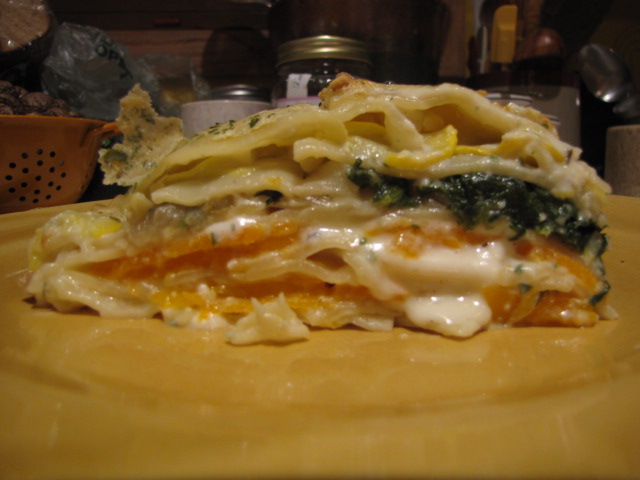
Butternut squash, spinach with caramelized onions, and yellow squash lasagna with a béchamel sauce

The mere mention of butternut squash makes my mouth water.  Everything about that lovely winter squash is appealing to me.  Its warm tan skin that yields to a pleasing orange flesh; its aromatic scent, and sweet, earthy flavor.  No matter how butternut squash is cooked it is absolutely delicious.

We had two small butternut squash leftover from another dish that called for them.  How to use the extra butternut squash, I wondered?  Thinking of the bad ass 4" deep lasagna pan my brother gave me for Christmas...  Lasagna!  Once this thought entered my mind the rest of the recipe fell into place.

First, start heating a large stock pot of water to cook the noodles.

To make the béchamel sauce I used Julia Child's recipe from Mastering the Art of French Cooking.  It is as follows:

This basic sauce takes about 5 minutes to make, and is then ready for the addition of flavors or enrichments.  

For 2 cups (medium thickness)
                                                   ____________________________

  • A heavy-bottomed, 6-cup enameled, stainless steel, lined copper, porcelain, or pyrex saucepan.
  • 2 TB butter
  • 3 TB flour
  • A wooden spatula or spoon
In the saucepan melt the butter over low heat.  Blend in the flour, and cook slowly, stirring, until the butter and flour froth together for 2 minutes without coloring.  This is now a white roux.

                                                   ____________________________

  • 2 cups of milk and 1/4 tsp salt heated to the boil in a small saucepan
  • To the milk I added 1-1/2 cups of heavy whipping cream.  This addition is considered an enrichment.
  • A wire whip
Remove roux from heat.  As soon as roux has stopped bubbling, pour in all the hot liquid at once.  Immediately beat vigorously with a wire whip to blend liquid and roux, gathering in all bits of roux from the inside edges of the pan.

Set saucepan over moderately high heat and stir with the wire whip until the sauce comes to the boil.  Boil for 1 minute, stirring.
                                                   ____________________________
  • Salt and white pepper
Remove from heat, and beat in salt and pepper t taste.  Sauce is now ready for final flavorings or additions.

* If not used immediately, clean sauce off inside edges of pan with a rubber scraper.  To prevent a skin from forming on its surface, float a thin film of milk, stock, or melted butter on top.  Set aside uncovered, keep it hot over simmering water, refrigerate, or freeze it.

Once the béchamel was finished, to it I added a 1/2 tsp of roasted granulated garlic, a 1/2 tsp of thyme, 2 tsp of parsley flakes, another 1/2 cup of heavy whipping cream, and 1 TB Romano cheese powder.

White roux

Adding milk mixture to roux

Finished béchamel.
Too bad the image is out of focus.


Next, thinly slice a large yellow onion (Vidalia, if they're in season) and begin sautéing it in a large skillet with a couple tablespoons of olive oil.  You should have about two cups of sliced onion, give or take.  Allow them to sauté slowly, stirring occasionally, until they begin to turn golden brown.  Once the onions reach this stage, add a 10-ounce bag of raw spinach to the same pan, right on top of the onions, along with 2 TB of water.  Place a tight fitting lid on the skillet, turn the flame up to medium-high, and allow the spinach to cook down.  Once cooked down, stir to mix the onions and spinach together.  Turn the heat off once the spinach has finished cooking.


Now for the squash - you will need two smaller butternut squash.  Trim away the skin and then run the squash lengthwise across a mandolin to shave thin slices off with each pass. Do this until you just reach the seeds.  Turn the squash and shave until you reach the seeds, and repeat.  After you've shaved away all four sides of the squash, cut away the core and then shave what remains of the neck.


Slice the yellow squash crosswise using the mandolin.  One average sized yellow squash will yield about 1-1/2 - 2 cups thinly sliced rounds.


Add the yellow squash to a skillet with 1 TB olive oil and lightly sauté over medium heat. Once they've softened and are slightly golden, remove from heat and set aside.

You're now ready to assemble the lasagna!  At this point, turn your oven on 375° F degrees to preheat.

Add a ladleful or two to the bottom of the lasagna pan, and then a layer of noodles.  Allow the sides of the noodles to overlap slightly.  Then, layer thusly:

  • Butternut squash (randomly added, not neat rows in a single layer)
  • Sauce
  • Sprinkle 1 TB of Romano cheese powder over sauce
  • Noodles
  • Butternut squash (again, randomly added)
  • Sauce
  • 1 TB Romano cheese power sprinkled over sauce
  • Noodles
  • Spinach and onion mixture
  • Noodles
  • Yellow squash with 1 TB Romano cheese power sprinkled on top
  • Noodles
  • Top generously with béchamel sauce, more Romano cheese powder, and parsley flakes


Not all of the butternut squash were used.  Most of them, but not all.

Yellow squash layer

Ready to go into the oven

Bake for 50 - 60 minutes in the center of the oven.

Viola!
Bon Appétit!


Saturday, August 25, 2012

Lisa's Salsa

To make my very own salsa, have ready:

5 lbs. tomatoes, coarsely chopped
1 large yellow onion, diced
1 large red inion, diced
1 large white onion, diced
2 large cloves of garlic, finely chopped
2 lbs. tomatillos, diced
1-1/2 tsp. kosher salt
Juice from 4 limes (approx. 1/2 cup)
1 lb. fresh strawberries, finely chopped
2 bunches cilantro, finely chopped

The Peppers:
I tend to buy whatever is available and looks good.  The variety of peppers varies from batch to batch but the peppers that always get used are Jalapeño and Serrano.  Other common peppers used include:

Georgia Flame
Banana
Melrose
Cubanelle
Anaheim

Begin by dicing the tomatoes.  Add them to a huge bowl so you'll have plenty of room to toss everything together.   Add the other ingredients to the tomatoes in the order listed above.  Toss everything together as each ingredient is added to get a visual on the ratio of each component.  The tomatoes should be the largest in size and volume.   Since we eat with our eyes first, the medley should look balanced too.

Unlike the other ingredients, the peppers never get minced by hand.  The reason for this is because, too many times to count, I've ended up rubbing one of my eyes with a capsaicin-laden finger and then howl and weep for at least twenty minutes following my mistake.  Use a small electric mill or food processor to mince the peppers.  Lop off the tops of the peppers and then split them lengthwise.  Use a paring knife to remove the seeds and membrane of the peppers to your liking.  (I'm not overly picky about this process.  In fact, it's pretty random.  Some peppers are stripped clean, others are simply chopped without being cleaned, and some peppers still have some of the seeds and membrane attached.)  Coarsely chop and drop the peppers in the food processor and loosely mince them.

Allow the salsa to steep at room temperature, stirring periodically, for and hour or two before refrigerating.  Taste and adjust with salt if needed, or to add additional peppers for more heat.

This recipe will yield about a gallon and a half of salsa.  I've tried to make less but, really, why?  It should go without saying that the best time to make salsa is in the summertime when the produce is in season, especially the tomatoes.

Enjoy!

Garlic Dill Pickles

The key to success when making pickles is getting the brine just right.  Too much salt and the pickles will ultimately shrivel and become soft; too little salt and the fermentation process won't be as efficient and the pickles will begin to spoil.

Most recipes call for approximately a half-cup of salt per gallon of water.  You'll also find many recipes that call for vinegar and an equal number of those that don't.  Personally, I like the taste that vinegar adds, along with the other spices and herbs, so vinegar is included in my brine recipe.

In a large stockpot, add 2 quarts of water, 1 quart of white vinegar and a half-cup of salt.  With the heat on med-high, stir the mixture.  You only want to warm the water just enough to dissolve the salt.  Once the salt is dissolved turn the flame off and allow the brine to cool.

Wash your cucumbers and remove any floral-ends still attached to the fruit.


Now we're ready to begin filling the quart jars with pickles, herbs and spices.


Begin by lining the bottom of your canning jars with a bed of fresh dill.  You can use the fern-like fronds as well as the flower heads, provided they're not spend and turning to seed.


This amount of dill is about a 1/4-cup.
Once the pickles are added, it will compress and take up less room in the jar.

Add pickles to the jar, lining them vertically without packing them in like sardines.  Once the pickles are in the jar, add the herbs and spices to the jar.

1 TB yellow mustard seeds
1 TB brown mustard seeds
1 TB coriander seeds
1/2 TB of black peppercorns
2 medium-sized bay leaves
2 large garlic cloves, coarsely chopped
More dill leaves if desired

When you're finished adding the herbs and spices, slowly ladle brine into the jar, making sure to add enough to cover the pickles.  I like to add a few of the dill flowers on top of the pickles to help keep them submerged, and then seal the jars with a lid and ring.

Place the jars in the refrigerator and allow them to ferment for 10-14 days before eating them.


If you have larger cucumbers (closer to deli-sized pickles), use a half-gallon canning jar and allow them to ferment 15-20 days before eating.  Double the amount of herbs and spices you use as well.

Shorten the fermentation time to one week if you choose to make pickles slices.

The whole pickles, regardless of size, should last in the refrigerator for 3-4 months, give or take.  Keep them as long as the pickles retain their crispness.  Homemade pickles are so delicious that having them remain in the fridge too long shouldn't even be an issue.


Saturday, July 7, 2012

Beet, Dried Cherry, and Red Wine Risotto

The following risotto recipe is from Risotto: 40 Exquisite Classic and Contemporary Risotto Dishes by Clive Tring.

- 5 cups chicken or vegetable stock
- Generous 1-3/8 cups dried sour cherries or dried cranberries
- 1 cup fruity red wine, such as Valpolicella
- 3 TB olive oil
- 1 large red onion finely chopped
- 1/2 tsp dried thyme
- 1 garlic clove, finely chopped
- Generous 1-5/8 cups risotto rice
- 4 cooked fresh beets, diced
- 2 TB chopped fresh dill
- 2 TB snipped fresh chives
- Salt and Pepper
- Generous 1/2 cup freshly grated Parmesan cheese, to serve (optional)


  • Bring the stock to a boil in a pan.  Then reduce the heat and keep simmering gently over low heat while you are cooking the risotto.
  • Place the sour cherries in a pan with the wine and bring to a boil, then reduce the heat and let simmer for 2-3 minutes until slightly reduced.  Remove from the heat and set aside.
  • Heat the olive oil in a large heavy-bottom pan over medium heat.  Add the onion, celery, and thyme and cook, stirring occasionally for 3 minutes, or until just starting to soften.  Add the garlic and cook for 30 seconds.
  • Reduce the heat, add the rice and mix to coat in oil.  Cook, stirring constantly, for 2-3 minutes, or until the grains are translucent.
  • Gradually add the hot stock, a ladleful at a time.  Stir constantly and add more liquid as the rice absorbs each addition.  Increase the heat to medium so that the liquid bubbles.  Cook for 20 minutes, or until the liquid is absorbed and the rice is creamy.
  • Halfway through the risotto cooking time, remove the cherries from the wine with a slotted spoon and add to the risotto with the beet and half the wine.  Continue adding the stock and the remaining wine.
  • Stir in the dill and chives and season, if necessary.  Serve with the Parmesan, if you like.
Serves 4 to 6

The result is delicious!  

Because a bottle of Valpolicella couldn't be found (I'll admit, I didn't look too hard), a bottle of Saserello was used to make this risotto.  Additionally, since the recipe doesn't specify a method for cooking the beets -and for goodness sake don't use canned beets!- I took the liberty of sautéing the diced beets in 2 TB of butter, a splash of olive oil, a pinch of salt, and 2 tsp of dried thyme.  Stir to evenly coat, cover and cook, stirring occasionally, just until the beets are easily pierced with a fork.  This took about five minutes.  Once done, remove from the pot and set aside.  Note: The beets were cooked in the same pot that I ultimately cooked the risotto in.  No reason to have all the beety goodness clinging to the pot go to waste.

Also, when it came time to add the wine, I added it all at once.  The cherries were pressed against a strainer to get all the wine out of them as well.  Save those boozy cherries, too!  They were splendid over vanilla ice cream for dessert.